In this article, I’m going to show you how to format eBook for Kindle using Microsoft Word.
Learning these techniques will just take two minutes, but applying them will take more than that. So please follow along slowly to master this craft.
We’re going to see all about:
- Styles,
- Indented paragraphs,
- Paragraph marks,
- Page breaks,
- Table of contents.
These are the five key ingredients for any Kindle eBook to look good and sell well when it comes to self-publishing on Amazon’s Kindle platform.
Styles
To create styles, all we have to do is click on that heading within our manuscript, that we want to convert into a title.
- Click on the sentence or line you want converted to Title.
- Go to the Home tab in MS Word and
- under the Styles group, click on Title. That’s it. This will take care of converting the formatting for any title that you have inside your book.

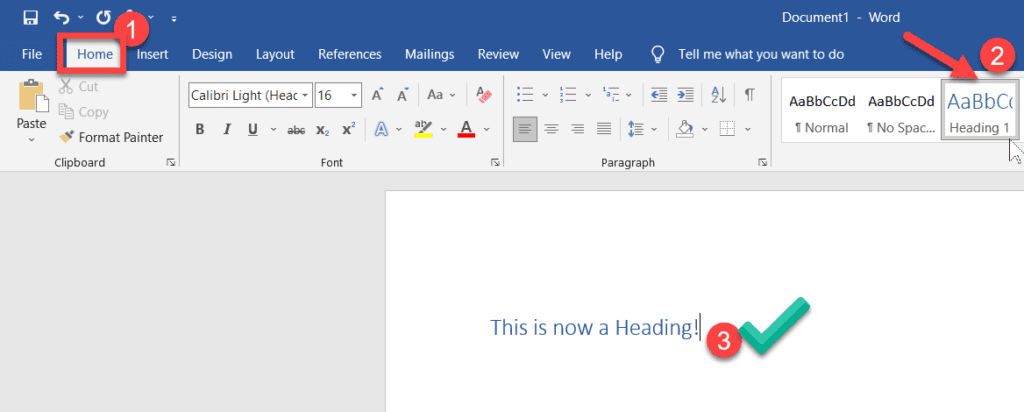
Now, we may also have different headings throughout our book that we want to include in our Table of Contents later. To do that, we want to convert the headings into Heading tags.
Remember, you can have more heading styles – heading 1, heading 2, heading 3 and so on.
I’m going to click on the sentences that I want converted into Heading 1, and then select Heading1 under the same Styles group within the Home tab.

Once all the headings are marked as Heading tags, it will help us in including them within our Table of contents automatically. We’ll see how to get that done in the final steps below. This is one of the critical steps to learn to format eBook for Kindle.
One important tip: do not use the Tab key to indent paragraphs. It looks ugly in an eBook.
That’s wrong, and it looks bad on the Kindle when it’s published. So, what we want to do is, again, create one more style for this purpose.
Indented Paragraphs
How to create a Custom Style in Microsoft Word
Let’s now create a new custom style, which when clicked creates the ‘first line’ formatting for the paragraphs to show proper indentation automatically, without using the Tab key.
Hit this keyboard shortcut (on Windows) to bring up Styles: Ctrl + Shift + Alt + S.
Or, click on this tiny arrow (within Home tab) to open the Styles window:

Then, click on ‘New style‘ to create a new style with the indentation settings.

This dialog box opens up:

- Give a suitable name for your Custom style
- Ensure you also check the box to Automatically update (as shown in the pic above)
- Click on the Format drop-down and choose ‘Paragraph’.

- In the Indents and Spacing tab, Indentation group, Special drop-down – choose ‘First line‘.
- Click OK.

If you find the indentation too much, reduce here within the “By” values adjacent to the Special drop-down:

This should take care of the First Line indentation without using a series of Tab keys.
Paragraph Marks
The next thing we want to know is if there are any hidden elements in our manuscript. We can find it by activating the Paragraph mark within MS Word:
Within the Home tab, click on this icon inside the Paragraph group:

Hitting that inverted P icon, shows us all the hidden formatting symbols.
Once activated, you can find any unwanted spaces, Enter keys, and remove them.
Page break
Just like how the tab key cannot be used to created indented paragraphs, we cannot also use a series of Enter keys to create new pages. Instead, we have ‘Page break‘ to make use of.
Here’s how: place your cursor wherever you wanted to insert a new page break, then go to the Insert menu and click on Page break.

Now that our eBook is clear with added Headings, sub-headings, devoid of extra unnecessary paragraph marks, spaces, enter key characters, and has a beautiful indentation for paragraphs, we can finally create an automated TOC (Table of Contents).
Table of Contents
If you had already created a manual TOC at the beginning of your eBook, now is the time to get rid of it. All our chapter headings, that we painstakingly formatted using styles in this article, will now be super helpful in creating the Table of contents.
Go to the location wherever you want to include your TOC (I assume this is within the beginning – ‘Front matter’ section of your eBook).
Click on ‘References‘ tab > Table of contents > Custom Table of Contents…

- Uncheck ‘Show page numbers’ because we don’t have any page numbers within Kindle eBooks. It’s subjective to the font size selected by the reader.
- Check the ‘Use hyperlinks instead of page numbers’ box.
- choose the number of levels you want to show your headings and click on OK.

This will create a clickable Table of contents that works amazingly well when published as a Kindle eBook on Amazon.

